
Marshmallow Chocolate Ice Cream
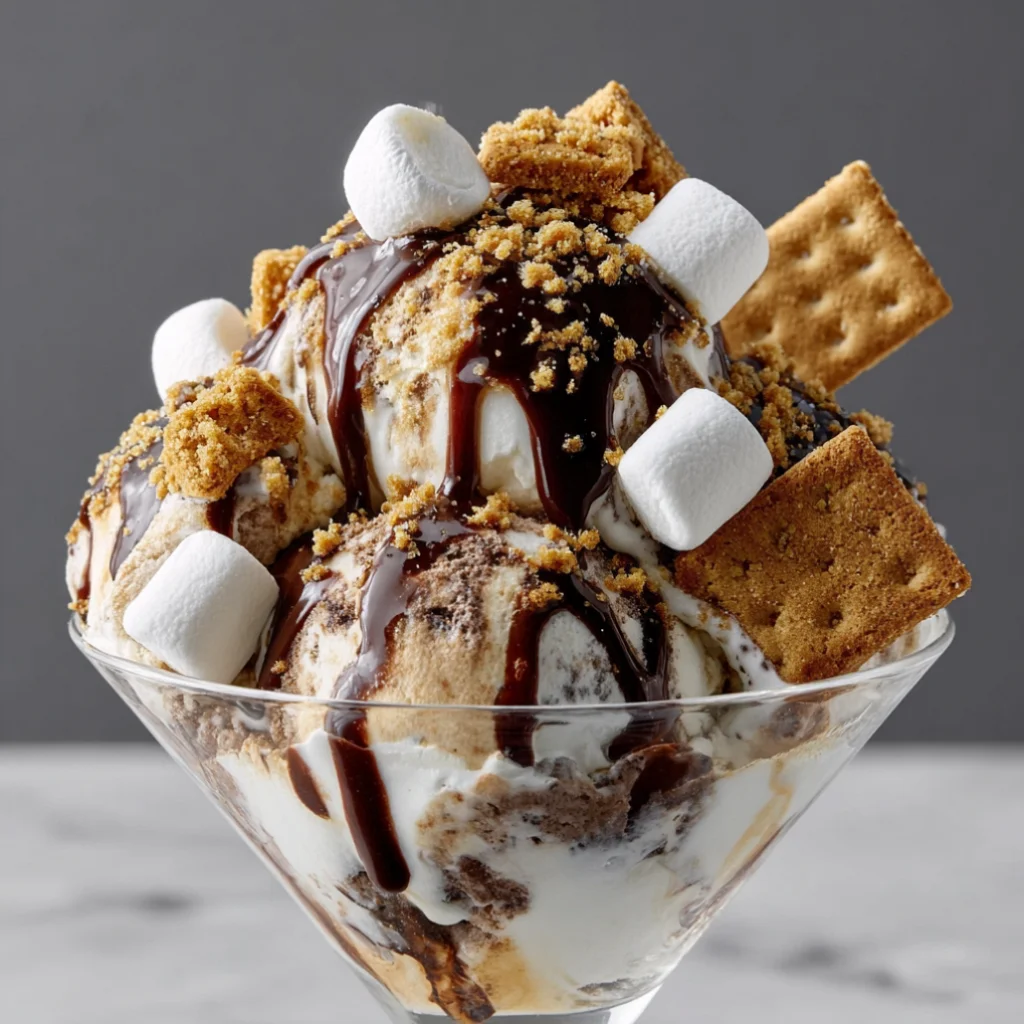
If you’re a chocolate lover with a penchant for indulgent frozen treats, look no further than this delectable Marshmallow Chocolate Ice Cream recipe. This creamy dessert combines the rich flavor of chocolate with the fluffy sweetness of marshmallows, creating a perfect summer delight. Whether you’re hosting a gathering or simply treating yourself, this homemade marshmallow ice cream is sure to impress. Follow this comprehensive guide to create a frozen masterpiece that’s both easy to make and utterly satisfying. Enjoying a scoop of this Marshmallow Chocolate Ice Cream is like biting into a cloud of chocolate bliss, making it a quintessential addition to your dessert repertoire. The silky texture and delightful marshmallow swirl will transport you to dessert heaven with every bite.
Ingredients
- For the Ice Cream Base:
- 2 cups heavy cream
- 1 cup whole milk
- 3/4 cup granulated sugar
- 1/2 cup unsweetened cocoa powder
- 1 teaspoon pure vanilla extract
- 1/4 teaspoon salt
- For the Marshmallow Swirl:
- 1 cup mini marshmallows
- 1/2 cup marshmallow fluff
- Optional Toppings:
- Chocolate chips
- Crushed graham crackers
- Additional mini marshmallows
- Chopped nuts for added crunch
Note: For a richer flavor, use high-quality chocolate cocoa powder, preferably Dutch-processed, as it has a deeper flavor profile. If you want to make a no-churn marshmallow chocolate ice cream, you can substitute the heavy cream with whipped coconut cream for a dairy-free version. This will not only give you a creamy texture but also a subtle coconut flavor that pairs beautifully with chocolate. Additionally, consider using organic or fair-trade ingredients for a higher quality and ethical choice. You can learn more about this topic.
Steps / Instructions
- In a large mixing bowl, combine the heavy cream, whole milk, granulated sugar, cocoa powder, vanilla extract, and salt. Whisk until the mixture is smooth and the sugar is fully dissolved. It’s important to ensure that the cocoa powder is well-blended to avoid clumping; you can sift it beforehand for an even smoother texture.
- Pour the chocolate ice cream base into an ice cream maker and churn according to the manufacturer’s instructions. This usually takes about 20-25 minutes or until the ice cream reaches a soft-serve consistency. You know it’s ready when it starts to thicken and leaves a trail when you lift the churner. The ice cream should have a creamy, thick texture that holds its shape.
- While the ice cream is churning, prepare the marshmallow swirl. In a separate bowl, mix the mini marshmallows and marshmallow fluff until well-combined. This creates a delightful, gooey swirl that will add texture and sweetness to your ice cream. The fluff should be thick, making it easier to fold into the ice cream later.
- Once the ice cream base is ready, transfer half of it to a freezer-safe container. Spoon half of the marshmallow mixture over the ice cream and gently swirl it in using a knife or spatula. This step is crucial for achieving that beautiful marbled effect—make sure to fold gently to keep pockets of marshmallow intact while still spreading it evenly throughout the ice cream.
- Repeat the process with the remaining ice cream and marshmallow mix. Use the knife to create a marbled effect, but be careful not to overmix. You want to see the swirls of marshmallow throughout the ice cream, which creates a lovely visual appeal once served.
- Cover the container with a lid or plastic wrap and freeze for at least 4 hours or until the ice cream is firm. For a firmer texture, you may freeze it overnight. When ready to serve, take it out and let it sit at room temperature for a few minutes for easier scooping.
Tips & Tricks
To achieve the best results, consider these pro tips: Check out our related guide for more tips. These strategies will elevate your ice cream-making experience!
- Storage: Store the ice cream in an airtight container in the freezer for up to 2 weeks. For best texture, let it sit at room temperature for 5-10 minutes before scooping. This allows it to soften slightly, making it easier to serve and ensuring that you get perfectly rounded scoops instead of hard chunks.
- Make-Ahead: You can prepare the ice cream base a day in advance. Just churn and freeze it when you’re ready to enjoy. This make-ahead option is perfect for parties or sudden cravings! Having the ice cream ready to go will save time and ensure you have a delightful treat on hand.
- Avoid Common Mistakes: Ensure your ice cream maker is fully frozen before adding the mixture; this ensures proper churning and texture. A warm bowl can lead to icy, grainy ice cream instead of a smooth and creamy texture. Also, be mindful of the freezing time to avoid a rock-solid ice cream that’s difficult to scoop.
- Pro Technique: For a richer chocolate flavor, consider adding chocolate shavings or chunks when swirling in the marshmallow mixture. This not only enhances the taste but also adds an exciting texture contrast. Additionally, you can sprinkle a bit of sea salt on top before serving to bring out the chocolate flavor even more.
Variations
- Vegan Option: Substitute the heavy cream and whole milk with coconut cream and almond milk, and use vegan marshmallows. This ensures that even those with dietary restrictions can enjoy this delicious treat while still savoring the rich chocolate flavor of the Marshmallow Chocolate Ice Cream.
- Chocolate Flavor Pairings: Try adding a pinch of espresso powder to enhance the chocolate flavor or mix in crushed cookies for added texture. A sprinkle of sea salt can also elevate the flavor profile beautifully, giving a delightful contrast to the sweetness of the marshmallows.
- Seasonal Flavors: In the fall, add pumpkin spice to the base or fold in chopped candy canes during winter for a festive twist. These variations can make the Marshmallow Chocolate Ice Cream a delightful year-round treat! Consider using seasonal fruits like fresh strawberries during summer for additional flavor and freshness.
Serving Suggestions
For a visually appealing presentation and delightful flavor combinations, serve your Marshmallow Chocolate Ice Cream in a bowl or a waffle cone topped with:
- Drizzles of chocolate syrup for added indulgence and a luscious finish
- Whipped cream to enhance creaminess and create a decadent topping
- Fresh berries for a tart contrast, balancing the sweetness of the marshmallows, such as raspberries or strawberries
- Chopped nuts to provide a crunchy texture that pairs well with the smooth ice cream
Pair with a refreshing iced coffee or a rich hot chocolate for an indulgent dessert experience. This combination not only satisfies your sweet tooth but also creates a memorable dessert experience for you and your guests. You can even serve it alongside a slice of warm chocolate cake for an extra-special treat!
FAQ
Can I make Marshmallow Chocolate Ice Cream without an ice cream maker?
Yes! For a no-churn marshmallow chocolate ice cream option, simply combine all the ingredients in a large bowl, pour into a freezer-safe container, and freeze, stirring every 30 minutes for the first 2 hours. This method helps achieve a creamy texture, even without churning. It’s a great alternative if you don’t have an ice cream maker on hand.
How do I fix ice cream that is too hard?
If your ice cream is too hard, let it sit at room temperature for a few minutes before scooping. This allows it to soften slightly for easier serving. You can also run the scoop under warm water for a few seconds to make the process smoother. Ensuring the right consistency is key to enjoying your delicious Marshmallow Chocolate Ice Cream.
Marshmallow Chocolate Ice Cream
This creamy dessert combines the rich flavor of chocolate with the fluffy sweetness of marshmallows, creating a perfect summer delight.
Ingredients
- 2 cups heavy cream
- 1 cup whole milk
- 3/4 cup granulated sugar
- 1/2 cup unsweetened cocoa powder
- 1 teaspoon pure vanilla extract
- 1/4 teaspoon salt
- 1 cup mini marshmallows
- 1/2 cup marshmallow fluff
- Optional toppings: chocolate chips, crushed graham crackers, additional mini marshmallows, chopped nuts
Directions
In a large mixing bowl, combine the heavy cream, whole milk, granulated sugar, cocoa powder, vanilla extract, and salt. Whisk until the mixture is smooth and the sugar is fully dissolved.
Pour the chocolate ice cream base into an ice cream maker and churn according to the manufacturer's instructions until it reaches a soft-serve consistency.
In a separate bowl, mix the mini marshmallows and marshmallow fluff until well-combined to create a gooey swirl.
Transfer half of the ice cream base to a freezer-safe container, spoon half of the marshmallow mixture over it and gently swirl it in.
Repeat with the remaining ice cream and marshmallow mix, creating a marbled effect.
Cover and freeze for at least 4 hours or until firm.
Nutrition Facts
Recipe Reviews
- ★★★★★
Excellent recipe!
Leave a Reply
Your email address will not be published. Required fields are marked *


Excellent recipe!